
Do you live to make people sweat towards their goals? Are you an athlete, trainer, physical therapist, or instructor looking to inform and provide people around the world with VR videos about exercises, nutrition, or even meditation? Shooting your own 360-degree virtual reality or augmented reality fitness video is at your fingertips.
-
Scouting Your Location
The world is your playground. You’re wireless and able to freely move through the world while holding a 360 camera. Use VR and AR technology to record the sights and sounds as you travel locally or to other locations. You may see something once that you may never see again. Time is of the essence — record it!

Tech and fitness enthusiasts, as well as anyone else for that matter, can search for fitness videos and watch them online or by using a VR headset, AR mobile phones, or special glasses. When planning and scouting out locations for your video make sure that your shots are recorded in places that you yourself would want to view.
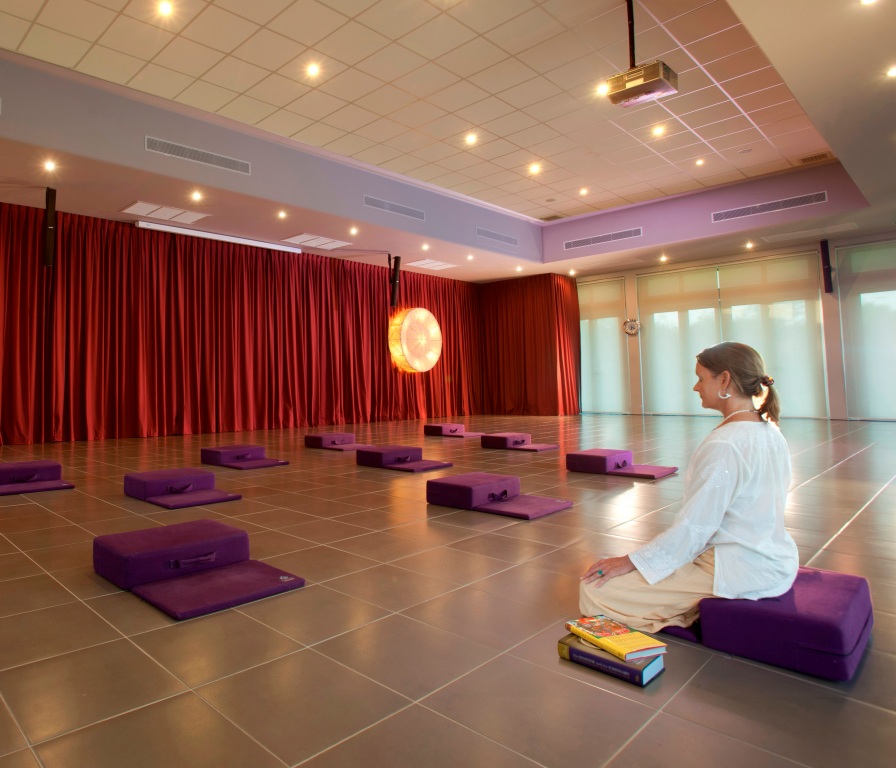
Indoor Ideas: A personal gym, basketball court, swimming pool, weight room, yoga studio, meditation studio, aquariums, your home, garage, and any place you can get clearance to film.
Outdoor Ideas: Go to national parks, local parks, theme parks (if you can get approval), places with unique architecture, look for street art, swimming pools, gardens, the beach, desert, mountain tops, places with a view, volleyball courts, basketball courts, and even your own backyard.
-
What to Consider Before and During Your Video Shoot
- Support. Having a realistic 360-degree viewpoint requires more than two hands. If you’re going to be the subject of the video — giving lessons weightlifting, creating health-focused recipes, or are developing an exercise and gaming experience — you are going to need someone to hold the camera or monitor it from a distance. Also, it doesn’t hurt to have a second opinion on camera locations and anything else you may encounter.
- Relevance. Make sure that your location relates to your content. If you’re a yoga or meditation instructor it’s probably a bad idea to have a noisy construction site or a desolate industrial area as your backdrop. It may be better to keep your shots within nature.
By Thanyapura (Own work) [CC BY-SA 3.0 (http://creativecommons.org/licenses/by-sa/3.0)], via Wikimedia Commons - Public vs. Private Space. Think about whether or not you want to deal with people in the background of a shot. Being in a private, remote, or closed off space may be more beneficial to your purpose if you are speaking lightly or want to be heard clearly without having to use a microphone.
- Light. Too much or too little light can wash everything out or make everything look drab. You’ll want to see if your camera can adjust to spectrum lighting indoors and outside.

Credit to: Predavatel, [GFDL (http://www.gnu.org/copyleft/fdl.html) or CC-BY-SA-3.0 (http://creativecommons.org/licenses/by-sa/3.0/)], via Wikimedia Commons - Seasons and Weather. Wherever you’re going, it’s a good idea to research what the seasonal weather conditions will be like when you’re visiting to shoot. Update your weather app and look at it every day leading up to the shoot. Make sure you are prepared for the sun, rain, wind, and any aggressive weather events that may be occurring.
- Environment. The images, video, and sounds you project effect other people for the positive and the negative. Think about what your future clients would expect from a motivational running video versus what they’d expect from a stairs only strength training drill.
- Feelings. Take other people’s feelings into consideration. Make sure that you aren’t breaking any social rules by filming yourself in a public gym where no one has given you their approval to film them. Especially be aware of where you are filming and the local cultural expectations. You don’t want to get caught filming in or near an area where you may get into legal trouble.
-
Cameras
Samsung Gear 360
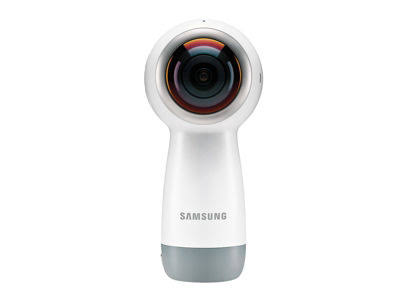
The Samsung Gear 360 is a double-sided, lightweight, and handheld camera that is paired with its own app. You’ll be able to record your video in 4K image quality, which is better than the old model. Feel free to live stream your fitness classes or upload them onto your website so your followers and clients can workout when they want.
Pros: Can be wirelessly linked to a smartphone or PC, and is even compatible with Android, iOS, and Mac. You’re free to purchase up to 256GB of SD card space. You’ll squeeze in 130 minutes of battery life when shooting at high 2560 x 1280 resolution and 30 frames per second for low latency. Pair it with the Samsung Gear VR. Has 5 viewing options: 360 view, stretched, round, dual, and panoramic for more versatility.
Cons: Blind spots and double images, live broadcasting resolution goes down to 1920 x 960, and you’ll need to invest in a tripod or other mounting accessory for better stabilization and a more hands-free approach.
Price: $125 to $230
Link: Samsung Gear 360
Ricoh Theta V
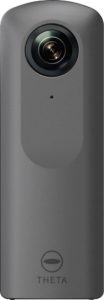
The Ricoh Theta V is another wireless/Bluetooth enabled, lightweight, and palm of your hand option for 4K quality and 360-degree video capture. It’s got two spherical lenses on each side that can go 30 frames per second and project 3840 x 1920 pixels, which is pretty dang good for something so small. You’ll be able to carry it in your own gym bag, purse, or backpack to spontaneously record mini-workouts or a full-blown boot camp at the press of a button.
Pros: Has a 4-way microphone so you won’t have to purchase another one, but you still may want to if sound quality is your dealbreaker. Can be paired with its own app for easy recording, editing, and sharing. The Theta V has a secure rubber coating that is easier to grip if you’re sweaty. It has VR viewing mode, text and stamp features, has interval shooting, and even time lapse!
Cons: There are three apps total that Theta products use — the main app Ricoh Theta S, the image editing app Theta+, and the video editing app called Theta+ Video. You’ll need to buy a separate wireless adapter to show 360 videos on TV and to use the camera as a remote control. If you’re a swimmer, scuba diver, water aerobics instructor, or just love the water, you’ll need to purchase a separate waterproof attachment for it.
Price: $430
Link: Ricoh Theta V
Garmin Virb 360
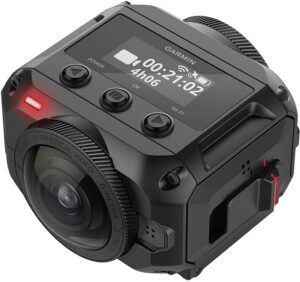
Take the Garmin Virb 360 with you as you trek in the desert, mountains, or anywhere that strikes your passion to get your heart pumping. The 4K and 30 frames per second deliver quality images that will give you a striking backdrop that your viewers will escape into. While the 4-way microphones will pick up your energetic voice as you describe your newest adventure to everyone at home. Pair this camera with any Garmin device to show viewers your vitals as you teach them the newest fit craze.
Pros: Allows for AR overlays with G-Metrix sensors, has a battery life of up to 1 hour and 5 minutes, and has two modes for video and timelapse for more creative control. It even has location capture, a barometer, gyroscope, and a compass so your film locations are always backed up by other data if you choose. The good thing about the Virb 360 is that it’s Android and Apple compatible for simple uploading, editing, and sharing.
Cons: It has a built-in motion control stabilization system that supposedly guarantees you smooth movement while filming, but they also offer a tripod and attachments to go with it. So, you’ll have to decide which option is worth it. The Virb 360 can be edited using desktop software but also has two apps — the Virb app and the Virb Edit app to choose from.
Price: $799
Link: Garmin Virb 360
-
Helpful Accessories
- Tripod – This will help you get better stabilization on uneven terrain or during movement. If you don’t want to make anyone motion sick, invest in one.
- Lens Wipes or Cloths – Be careful to make sure to look at the manufacturer’s recommended cleaning products before you touch your lens with a cleaning agent or a cloth! These wipes and cleaners may work for your VR gear but they may damage, scratch, or ruin your 360 gear if they aren’t compatible.
-
How To Recognize Stitching
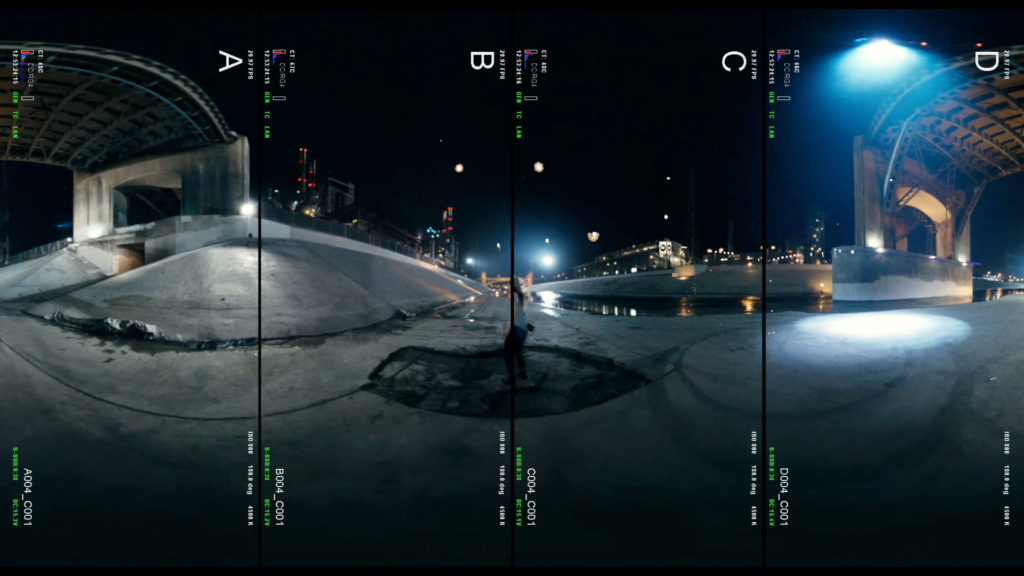
When shooting a 360 fitness video you need to be aware that these special cameras have spherical lenses that capture two halves of the video you are recording. Those two halves have to be connected back together somehow to form the 360 view, leaving the end video with stitching, or an imperfect smudging located at the midpoint where those two images merge. Some 360 cameras have self-correcting software that comes with the gear, while other manufacturers will require you to purchase editing software to fix and add other elements like graphics, sound effects, music, and even stickers and filters to your video.
-
Editing
Are you a do it yourself and take charge kind of person? Or are you the get it done right by a professional type? DIY can be empowering and give you lots of hands-on control, but hiring a designer or developer will save you time and energy. Which method will you pick?
How to Find a Designer or Developer

Not a do-it-yourselfer? You know who you are and your level of ability with editing. Why put a square peg in a triangular hole? Having a developer and designer on deck with your project will help you create a unique look for your brand, will help you create VR and AR interactive elements to your videos, and will make a video into a game, training session, or an informative piece on health and nutrition.
If you’d like to turn your 360 videos into an interactive game that will let players throw cartoon barrels like arcade apes of the past, you’re going to need a professional’s assistance. Set up and account, search for VR and AR designers and developers at competitive prices.
Tip: Freelance isn’t free, so invest top dollar for top quality.
Desktop Editing Programs

Are you all about DIY? You’re in luck. Some 360 cameras come with editing software that makes it easy to upload, edit, add captions and music, and post online. However, other cameras might not. This is where VR and AR compatible editing programs come in. Be warned, there are no prices listed. Some are free to use and others you will have to pay to have access.
- Adobe Premiere Pro CC – Windows and MacOS friendly. This is what the pros use to create graphics, titles, add audio effects, and edit images and video in order to create tv shows, films, and web media.
- After Effects – Windows and MacOS friendly. Used for creating motion graphics and special visual effects.
- Final Cut Pro X – Mac users only, sorry PC people. For use in post-production so you can edit your videos, add 3D titles, and manipulate the color quality.
360 VR Video and Photo Editing on Steam
VR Mobile Editing Apps
- V360 – iOS and Android compatible.
- Collect 360 – Beta is on Google Play, alpha is at the iPhone Store.
- VeeR – In early access online for Android and iOS.
- Pie – Only for iPhones, sorry Android users.
AR Mobile Editing Apps
- Lumyer – AR editor for Apple phones only.
- Reality Editor 2 – Their starter app is available iOS only.
- ROAR – AR editing that uses Apple and Android phones.
- Holo – Hologram AR for Android and Apple phones.
- UDVISER – AR app that’s coming soon to Apple and Android phones.
-
Upload It and Share

You can upload your 360 VR videos on the internet using these links to get to their guides.

You can upload your new 360 AR app online by following the links to their guides.
-
Have Fun Filming!


As far as editors go, Cyberlink Power Director is an excellent affordable professional Windows program for editing which includes 360 video with robust options.
Great article! We are looking for cycling 360° videos for Fit Immersion. If interested in opportunities please contact me!