
Get the most out of your Oculus Quest with these accessory ideas
The Oculus Quest is an amazing device. Offering a full six degrees of freedom virtual reality experience, no computer required, it’s the first standalone headset that truly targets mainstream consumers. It’s wireless, use anywhere nature makes it a great choice for virtual reality fitness. Since buying mine nearly all of my exercise in VR has been performed exclusively on this headset, as the untethered experience allows for more freedom of movement, increasing immersion and making workouts more fun and rewarding.
One of the great benefits of the Quest is that you can use it anywhere. Maybe you have a large garden and want to utilize the extra space to create a virtual tennis court in Sports Scramble, or perhaps you want to play BoxVR in your garage alongside the rest of your gym equipment.
Ease of set up, portability and versatility are all hallmarks of the Quest and I’d go so far to say that for active VR and fitness, there is simply no better headset.
Guide structure and overview
In this article, I want to look at the full range of accessories that are worth buying for your Quest and will recommend both official and third-party solutions to typical problems and scenarios that might arise if you are using the Quest as a fitness tool.
There’s a lot of content here and some of these accessories might be useful to you at different times, so be sure to bookmark so you can come back later as you progress further into your vr fitness journey.
I’ve organized this information into two categories. Firstly we’ll look at what I consider to be the essential accessories that every user needs. Then we will investigate some of the more specialist items out there that won’t be for everyone but could be a vital element or upgrade if you have specific requirements or needs.
We’ll go into much more detail below but as a quick overview let’s outline all the accessories that we’ll be covering. Starting with the essentials, when using your Quest for exercise it’s crucially important that you are exercise ready by sorting these three areas;
- Sweatproof the HMD and make it easy to clean down between exercise sessions.
- Purchase a travel case to safely store your Quest and allow for easy transport.
- Improve the audio quality for enhanced immersion and epic Beat Saber bass.
These represent what I feel to be absolutely essential upgrades for any Quest owner and are the first accessories you should consider.
Then, in the second part of the article we will look at some more specialist peripherals
These will include accessories to;
- Extend the Quest’s battery life.
- Enable glasses wearers to instead use prescription lens inserts
- Improve the hand grips and comfort of the Touch controllers
- Enable your Quest to play in low light/dark conditions.
Ok that’s the outline let’s get into the details, starting with the essentials!
Sweatproof Your Headset to Make it Exercise Ready
If you’re working out, your sweating, and if your sweating into an electrical device you need to take precautions to avoid damaging it. You’ll also want to ensure its easy to clean between sessions so it stays nice and fresh to use. Don’t be over-concerned about the sweat issue, with proper preparation you can safely workout even for intense sessions, but you do want to ensure your headset is appropriately equipped for the job.
First step, wear a headband! This serves a double function, first to reduce the amount of sweat getting into the headset, but it will also secure the headset more firmly onto your head. The Quest is quite front heavy and I find the headband helps it stick to my head better, which is important in high action games.
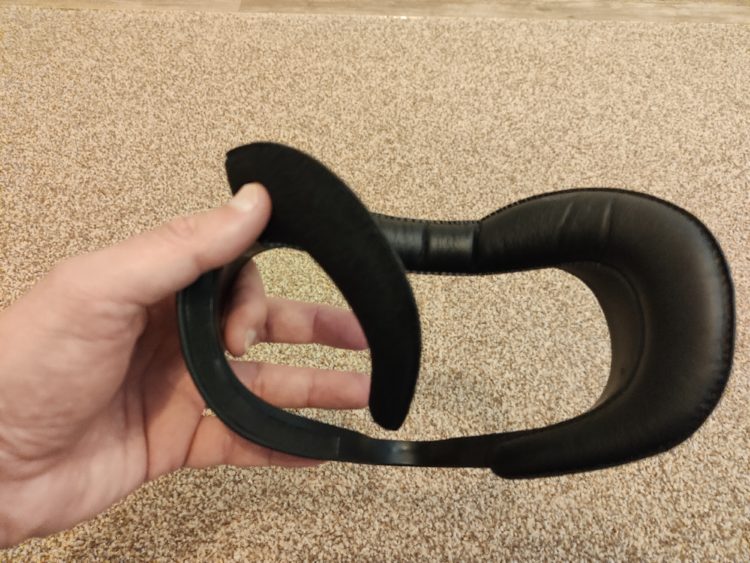
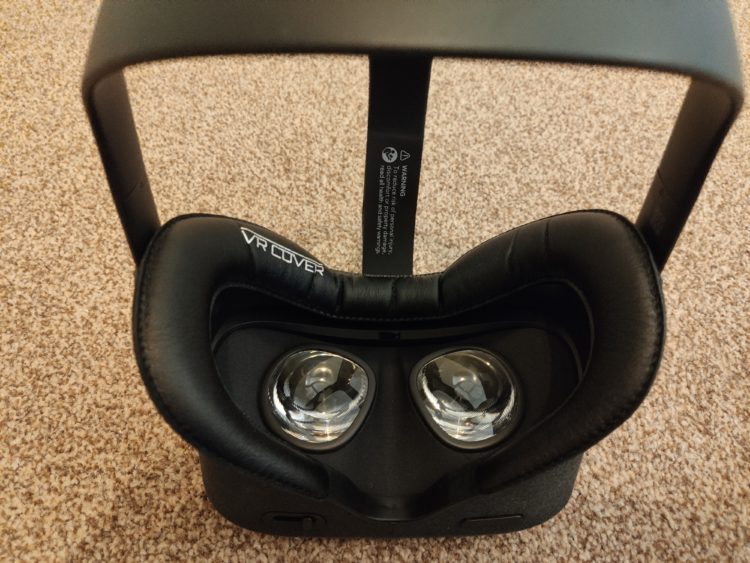
You’ll also want to invest in a replacement interface and cover that you can wipe down between sessions or even machine wash. When it comes to the best covers there is an easy recommendation, VRCovers. VRFitness staff writer Gabriel Moss reviewed the replacement interfaces from VRCover, and they come highly recommended. Interestingly Gabriel reported that the faux leather pads were uncharacteristically uncomfortable to use, unlike all of their previous covers for other headsets. This issue has been confirmed by VRCover themselves, who stated it was due to a last minute design change to the Quest itself by Oculus, who didn’t inform VRCover prior to launch. They have recalled the kit and have now fixed this. The release date for the revised interface is mid September although they are in the process of fulfilling previous orders now. I actually ordered the covers way back in June and finally received the revised edition at the beginning of August. I am very happy with the fit. Ordinarily I’d prefer a thin cover to maximize field of view but with the Quest being so front heavy the extra padding on these covers really helps with both comfort, and in securing the headset securely to your face. Having used it for a couple 90 minute sessions over the weekend I can confirm the faux leather covers are comfortable for me, and it feels great to be able to just wipe clean after use. You get two covers with each facial interface so if you really sweaty you can simply swap the cover out for the second one, ideal if you are sharing the headset.
You can buy the VR Cover interface here.
Make sure you also always have on hand some baby wipes and paper towels to thoroughly clean your headset after use, and you’ll ensure it remains clean and in great condition for years to come.
Get an Oculus Quest Travel Case
By far the greatest advantage the Oculus Quest has over other headsets is its ability to be used anywhere. This is a device designed to go where you go and as such the next essential accessory you will want to buy is a decent, protective travel case.
Oculus released their own official case for $40 and its what I own. Honestly the price feels a little high, but it is a nice quality case that the Quest fits very securely and snugly into. There is enough room for the headset, controllers and the charger but you’ll struggle to get extras such as battery packs into the case so if you have a lot of accessories to carry you may want to look elsewhere. Personally I’m very happy with it, but a popular alternative brand recommendation that I’ve seen on various sites and Youtube reviews are the Navitech Rugged backpacks which are designed with a few more pouches and pockets, useful if you have extra accessories to carry around. As a universal VR headset travel case rather than Quest specific it might also be more useful over the longer term if you have other headsets you want to use on the go in future.
My photos demonstrate how the headset and controllers fit into the case.
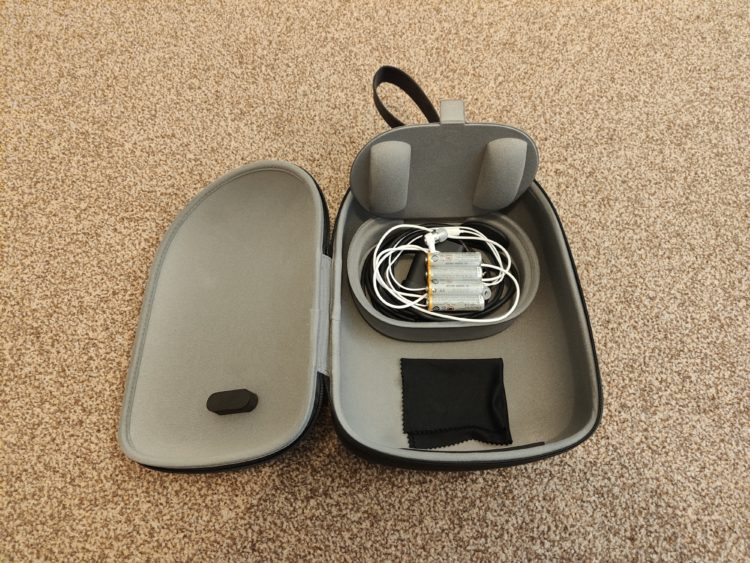
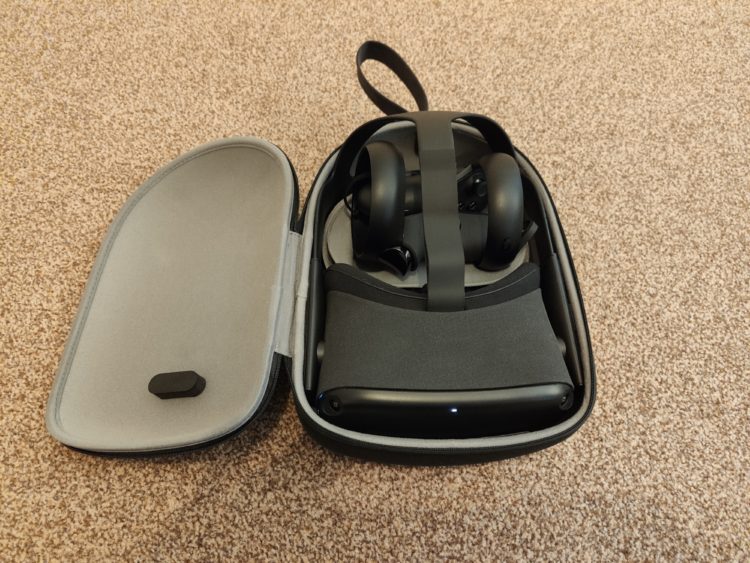

You can see there’s a bit of extra room for some headphone earbuds, batteries and a cleaning cloth, but you’d struggle to fit anything else in there so if you’re travelling heavy you might want to explore more utility style cases. In that case check out this roundup article from Android Central for more case ideas or watch MRTV’s video review of a Navitech case below.
Upgrade Your Audio Experience
Whilst the in strap audio of the Quest is acceptable for general gaming and Netflix use, it’s woefully insufficient for reproducing bass-heavy music. Beat Saber and BoxVR are particularly underwhelming and so you’ll definitely want some headphones to get the most out of these games.
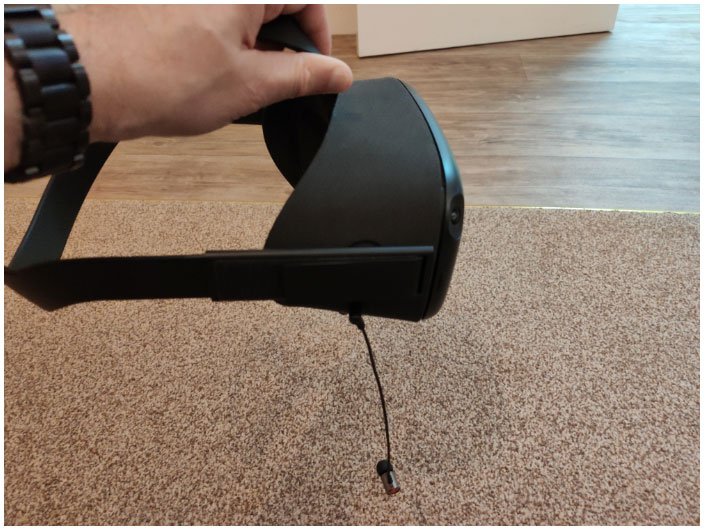
The good news is that the Quest has a standard headphone jack on both its left and right sides and you can plug your own headphones or mobile phone earbuds into either to get an instant sound upgrade at no cost. I have some Samsung earbuds and they sound great to me, with decent bass and sound roughly as good as my original Oculus Rift. The cord is annoyingly long which I solve by throwing it over my head and wrapping around my neck. I intended this as a short term fix until I bought some decent headphones but honestly once put on I don’t really notice the cable at all so I’m in no rush to spend more money just yet.
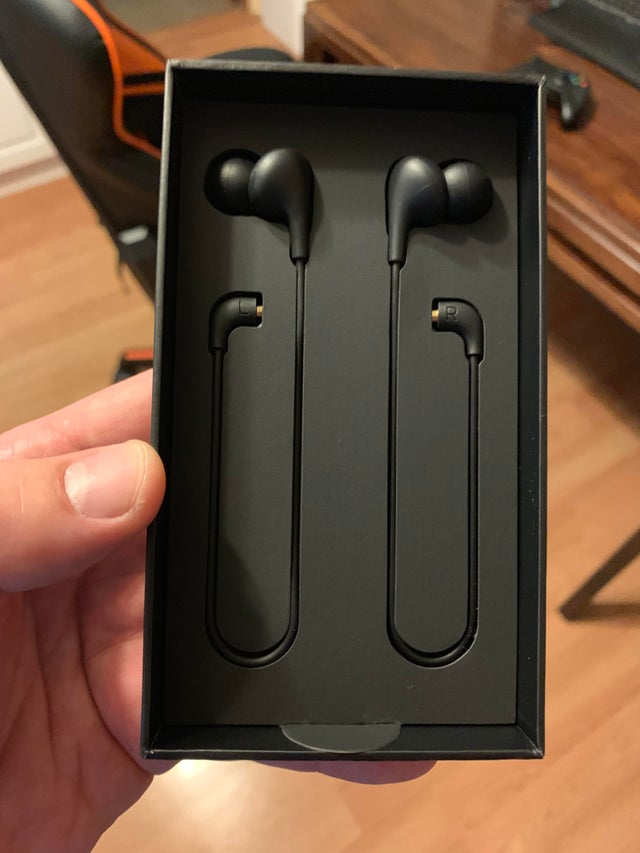
If you are happy to part with some cash for a better audio solution Oculus will sell you their Oculus Quest In Ear Headphones that come with short cables that plug into each of the left and right audio jacks. They are not cheap at $49 but reviews seem to be positive. Reddit user Eyeluvflix posted his own experiences with them recently and I’m using his photo of the product below.
You can buy the official earbuds directly from the Oculus store, here.
UPDATE 0 07/09/2019
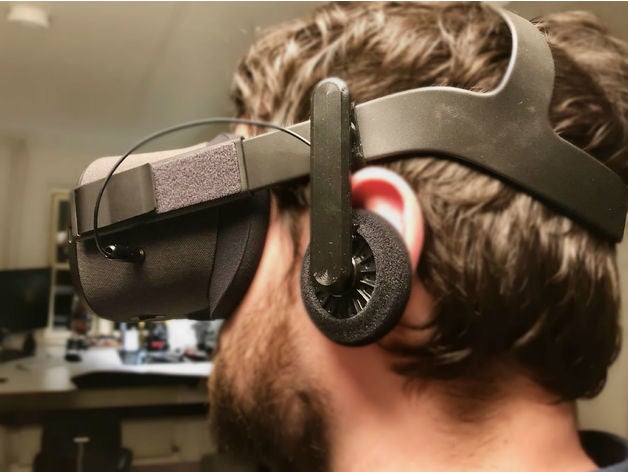
Since writing this article I came across some short cable in earphones available on the Amazon store from a company named Spectrashell. At only $23.99 they are around half the price of the official Oculus earphones. I had picked up a pair and have to say I’m quite impressed with the quality at this price. As you can see from my pictures they clip in on either side of the Quest and the short cable length ensures there’s no tangling of wires to worry about. The sound is fairly good for the price, I initially thought they were a little tinny but quickly realized it was because they needed to be pushed a bit further than normal into my ear. Once in properly they sound about as good as the Samsung phone ones I was using, without the hassle of the long cable.
 If you’re interested you can get them from Amazon here
If you’re not a fan of earbuds and want some over-ear headphones there is an easy, affordable recommendation, the Koss Porta Pros. This affordable headset is around $35 and according to popular tech site Tested are the exact headphones used on the original Oculus Rift. These deliver excellent audio with decent bass at a very modest price and are clear value for money winner.
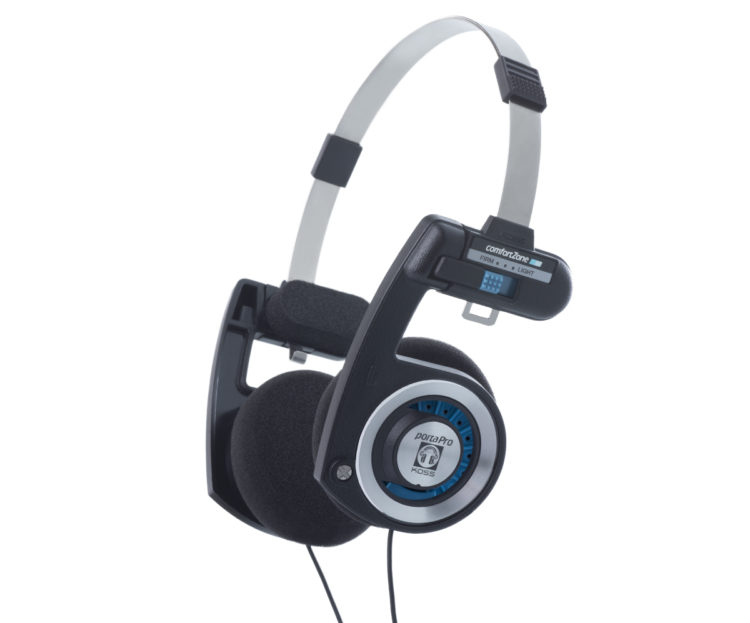
The headphones should fit pretty easily over the quest itself but if you’d prefer to have them mounted as on the original Oculus Rift, this is possible thanks to 3D printing. www.thingiverse.com have downloadable print files which you can either 3D print yourself or send to a 3D printer service to have made for you. Link to the files here.
Finally, if you’re a bass fanatic and happy spending out more on headphones the Skullcandy crusher wireless set might be worth exploring. They deliver excellent base and although the Quest doesn’t support Bluetooth natively you can purchase short cables from Amazon and plug them straight in. GizmoSlipTech’s video review of these below is worth a watch if you’re interested.
Other accessory ideas for special use cases
Ok, so we’ve taken a good look at what I consider to be the absolutely essential areas where accessories can help, in protecting your headset and increasing immersion through better audio quality. We’ll now examine a list of accessory ideas that may be of value to you in specific situations. You certainly don’t need any of these to safely enjoy working out in VR but they are accessories to consider after you’ve been using your headset for a while and have a good feel for whether or not these might be useful to you.
For this part of the article, I’ve decided to adopt a problem versus solution format, so that you can read through, and see if any of these problems resonate with you, and hopefully, some of these ideas can help!
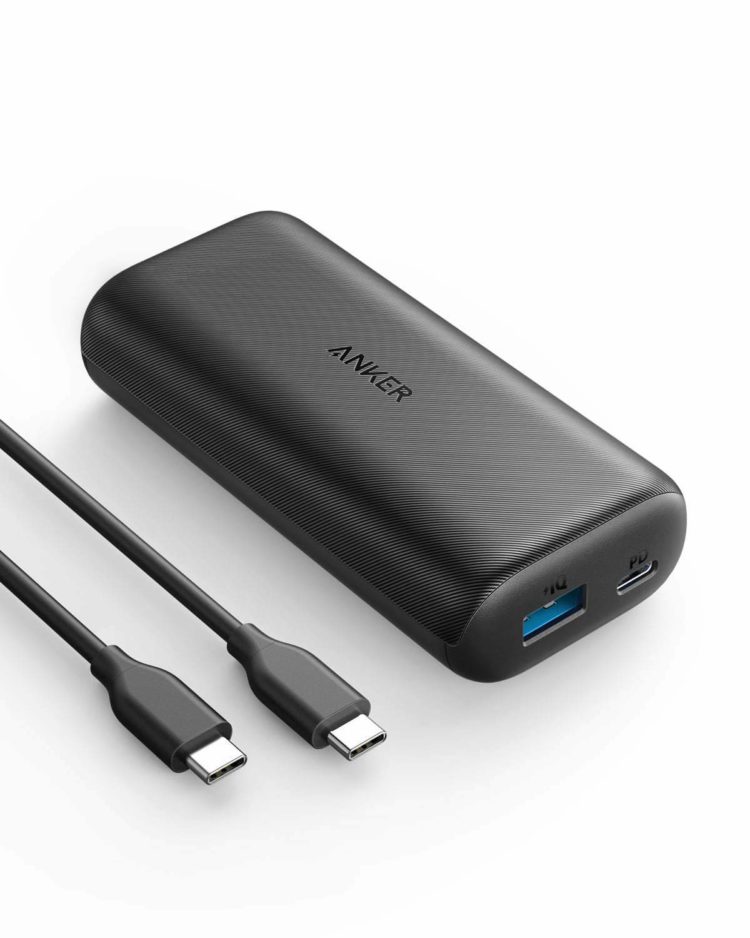
(Problem) The Quest battery doesn’t last long enough – Solution – Buy an Anker battery pack! Can also improve headset comfort!
The Quest battery lasts for around two and a half hours of continuous use. For most users that will be plenty long enough, especially considering it doesn’t take much longer than an hour to fully recharge. Therefore I wouldn’t rush out and buy one of these as soon as you get your Quest. You may find through experience however that sometimes you need a little more juice. Maybe you are partial to marathon Beat Saber sessions, or you take your Quest with you on excursions where you can’t readily recharge it, an overnight camping trip perhaps. In these situations, a battery pack is exactly what you need. Oculus doesn’t provide an official solution but there is a clear consensus choice when it comes to brand recommendation, the Anker Powerbank series of battery packs. When it comes to selecting an exact model, for most people that would be the Anker PowerCore 10000. These are confirmed to work extremely well with the Quest, providing an additional five hours or so of battery charge, giving you around eight hours continuous playtime total.
Interestingly many users have claimed that when attached to the rear headset strap a battery pack will act as an effective counterweight to the Quest’s front-heavy screen, and feel that it considerably improves overall comfort by redistributing the weight from the front of your face. This video below will give you a simple how-to guide if you are interested in trying this.
(Problem) I need glasses but don’t like wearing them in my Quest – Solution – Buy prescription lens inserts from WidmoVR!
The Oculus Quest is not the most comfortable device to have strapped to your head for long periods, and that discomfort is likely compounded if you are also wearing a pair of glasses inside it. To their credit Oculus includes out of the box a handy spacer that you can insert into the headset that gives additional room to allow for glasses wear. This is an improvement over the original Rift, where glasses simply did not fit at all. If your glasses are quite small and discrete you may find this is good enough for you, or maybe you can see well enough without glasses to solve the problem that way. However, wearing glasses does increase the risk of scratches to the Quest lenses, and potentially to your glasses too, to say nothing of the increased likelihood of all of your lenses fogging up when you exercise. If you find this happening there is a great, albeit not cheap solution, and that is to order prescription lens inserts.
WidmoVR offers a wide range of lens adapters for various headsets including the Oculus Quest. Starting from $65 they also have options for high index lenses and blue light protection. Reviews are excellent and they are enthusiastically endorsed by popular Youtube VR content creator and glasses wearer Mike from Virtual Reality Oasis, who uses them himself in all of his headsets.
The link to their Oculus Quest lenses is here, and the brief video below shows how they clip into the Quest for use.
(Problem) The touch controllers are slipping in my sweaty hands and it interferes with my Beat Saber sessions – Solution – Buy some knuckles style grips from Mamut!
The Oculus Touch controllers used on the Quest are great, being both ergonomic and intuitive to use. They are not perfect, however. The controllers themselves are quite small and a little fiddly to use if you have large hands. Some users complain of the magnetic battery housing sliding off during gameplay, especially in intense action games where you are gripping the controllers with force, exactly the kinds of games we want to use for exercise. Then there is the safety issue. The controllers do have a wrist strap but not everybody uses them (I’m guilty here!) and occasionally you might just let one fly. This could damage both the controller and any nearby furniture, especially screens or lamps. Thankfully there is a handy fix for this, by way a grip accessory from Mamut.
The Mamut Touch Grips simply slide over your Touch controllers providing you with more grip, and then a strap comes down around your hands which means the controllers are held securely in place even if you let go. This is one of the more requested features on VR controllers since the Valve Index knuckles released, as being able to release your grip around the controllers adds considerably to immersion. Now you only need to ‘hold’ the controllers when you wish to pick something up in-game. Of course, they dramatically improve safety as well with no risk of them flying out of your hands, and it eliminates the battery case sliding issue.
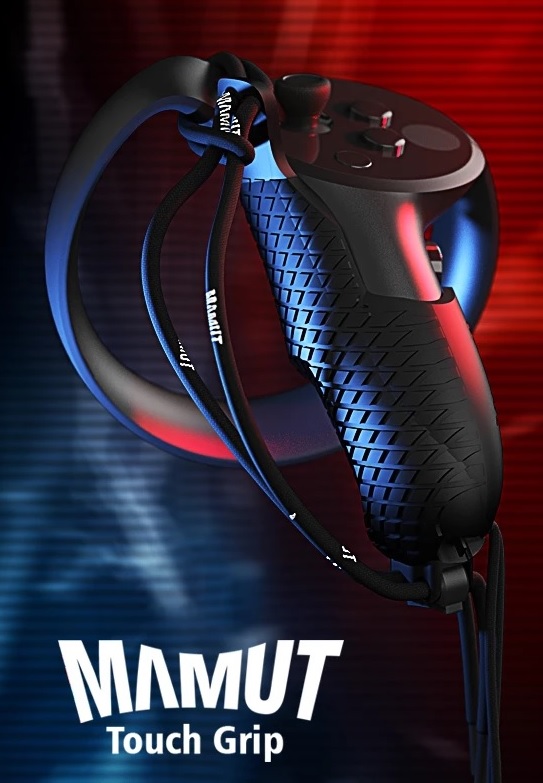
The video below will give a better idea as to how these work if you are interested and if you’re interested you can purchase them here.
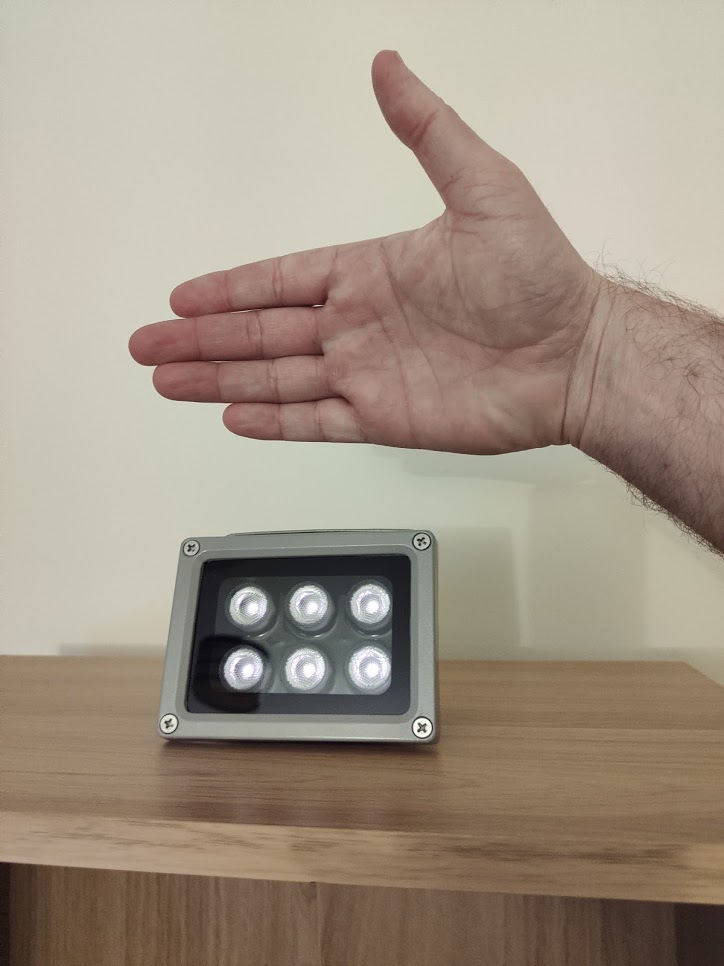
(Problem) I want to use my Quest in low light conditions but the tracking is lost and the headset stops working – solution – Buy an infrared illuminator!
This final accessory idea won’t be for everyone, but it’s absolutely essential if you want to play your Quest in the dark without any lights on. Why might you want to do that? Maybe your partner is watching a movie or resting and wants the lights off. Or perhaps you find using your Quest more immersive in the dark when you won’t have any external light entering your headset around the nose area. Or maybe like me, you might have thin curtains which allow an outline of you to be seen through them at night, and you don’t want your neighbors to see you and think you’re crazy!
If any of these reasons apply an infrared illuminator is super cheap and bathes your play area in infrared light meaning you can play in what, to your eyes at least is complete darkness. I prefer to play in the dark at night to eliminate the light leakage around the nose area to increase immersion and this allows me to do so perfectly.
I will link to the one I own here, but I’m in the UK and if you’re a US reader that exact model might not be available. Any infrared illuminator will do, just make sure you don’t buy an infrared heating lamp. Check out Amazon for details, you won’t need to spend much more than $20 – $30 dollars max.
As you can see from my photo the device itself is tiny and does its job perfectly just sitting on a bookcase, no need to wall mount. You don’t need to buy a large one for indoor use.
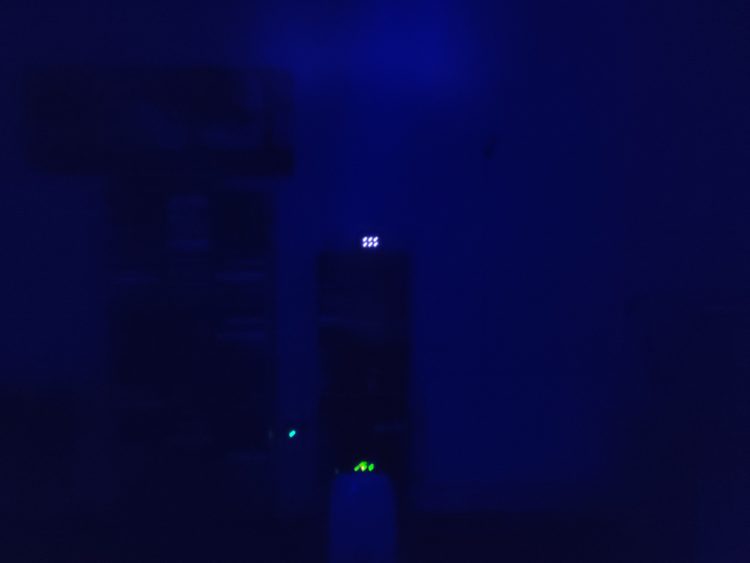
In this second photo below you can see what my room looks like to me when I’m playing. The blue light in the room is from my PC which has an open glass casing with lots of blue LED’s around the water cooling. If my computer wasn’t lit up however the Quest would still function perfectly in just the infrared light. When I put the headset on the black and white image of my room is just as bright as it is in the daylight so a small IR illuminator goes a long way!
Closing remarks
So that completes the list of what I feel to be the most useful current Quest accessories, that will increase the versatility of your headset and keep it safe and protected for years to come. If you have any ideas for other accessories that you have found useful then feel free to share in the comments!