
For something that was never designed to be used as a piece of bonafide fitness equipment, the HTC Vive and Oculus Rift hold up extremely well to the rigors of exercise use. It’s reassuring to know that as the technology progresses, and future iterations released, that the same aspects that will improve VR for gaming and productivity will also make it more exercise capable. Lighter, better-ventilated headsets, full body tracking, and of course wireless technology. Until that day arrives – hopefully soon – we are left to our own devices to navigate around our VR cables. Here are the best solutions.
Elevating the cable
Elevating the cable is the simplest alternative to having the cable on the floor. All that is needed is a way to anchor the cable at approximately head height or higher outside the room scale boundary. I use chip-clips. When anchored properly, the cable descends just short of dragging to the floor before rising again to the headset. This way the cable is off the floor and away from your feet so it won’t get stepped on.

The drawback to this solution is that turning your body, a full rotation requires either reversing back the other direction or stepping over and through the hanging cable. This is what I choose to do with my home setup because it’s enough to keep me from getting tangled while still allowing me to tuck everything out of the way when I’m not using it.
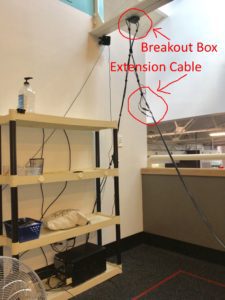
The cable can be elevated even higher than my home setup. At VR Fit in Columbus, Ohio, we have the breakout box anchored to an overhead beam. This requires an extension HDMI, a USB Cable, and DC Cable going from the linkbox to the 3-in-1 cable to the headset to accommodate the extended length the cable needs to travel. Depending on how the linkbox is situated, having extension cables can also serve the purpose of being a breakaway point if the cable gets pulled too far or too hard, preventing damage or harm.
If you need an extension from the linkbox to the computer, the previously linked HDMI and USB cables will work, but I’m unaware of a DC cable that will work. Instead, I use a traditional DC power extension cord.
You can see the anchor point is at the mounted breakout box just outside the room scale bounds which are marked in red on the floor.
Pros:
- Simple installation
- Little or no cost (except for possible HDMI/USB/DC extensions)
- Keeps cable away from feet
- Can be easily disassembled or tucked away
Cons:
- Turning a full 360 requires stepping over cable or reversing direction
Overhead suspension
Overhead cable suspension systems are what most VR arcades use to manage cords because it removes any chance of getting your feet and legs tangled. For this, you’ll need two to four retracting reels. Badge or key reels or retractable dog leashes will work. There are also reels that are marketed for this specific purpose. Both reels are ceiling or wall mounted. Carabiners may come in handy for attaching the reels to an anchor.
The first reel(s) are anchored near the PC with a velcro tie affixing it to the cable. The benefit of using multiple reels is the increased range the reels can extend, and it also helps decrease the tension pulling on the cable.
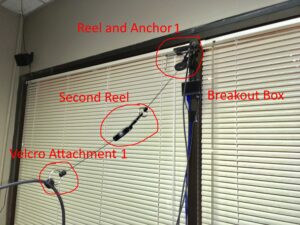
The remaining reel(s) are anchored directly overhead in the center of the room scale.

The 2nd velcro attachment is affixed midway between the headset and the overhead reel.
The 3-in-1 cable that is directly overhead the headset and connects to the reel shouldn’t be taut but should have just a bit of slack. In the picture below the velcro (which can slide up or down) is very close to the headset. This has the reel under constant extension and will create constant tension on the headset. Whenever you step away, lean, duck or squat, you will be aware of the pulling tension coming from overhead, which is immersion breaking.
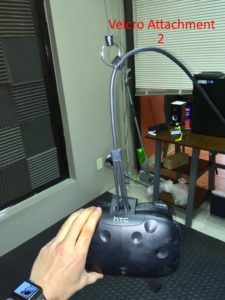
Better to slide the 2nd velcro attachment upwards until there is some slack overhead free from tension. However, too much slack will have the cable dangling down where it will be in danger of getting snagged by the hand controllers or even looped around your neck.
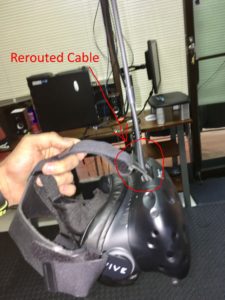
You’ll also want the cable rerouted to the front of the HMD so that it isn’t pulling your head from behind.
Once everything is properly set, you should have a bit of range before the cable begins tugging on the reel. One drawback is that depending on the recoil strength of the reel there will be some noticeable tension coming from overhead once it does begin to pull. Adding additional reels can help reduce the tension. Having this setup in place also means either having your headset permanently hanging from the ceiling or disconnecting the headset between uses.
Pros:
- Allows 360 rotation, although with eventual coiling
- Low cost
Cons:
- Mounts to ceiling
- Permanent fixture
- Some overhead tension on the headset as the reel extends
- Cable can still be snagged when reaching overhead
Wireless add-ons
The TPCast wireless upgrade kit for the HTC Vive has gone on sale for pre-orders in the United States and Europe and will be available to ship September 25th. It’s $299 in the US from The Microsoft Store and Amazon and €349 EU in Europe. The pre-orders appear to be sold out at this time, so keep check back for it to be in stock. The kit includes everything you need to free yourself from the tethering cable altogether. A 60 Ghz transmitter connects to the Vive linkbox where it will need to be in visual range of the HMD mounted receiver. The receiver integrates into the HMD and is powered by a battery that will also be worn. The 20100 mah battery that comes standard with TPCast offers about 4.5 hours of juice before either needing to be swapped out for a full battery or recharged.
A TPCast for Oculus Rift is also nearing release.
Intel is developing the WiGig wireless system for the HTC Vive and Oculus Rift as well.
This article will be updated as further developments are made.
Pros:
- Total freedom of movement
- Wireless transmitter is less space invasive
Cons:
- Expensive
- Limited battery life
- Complicated installation


